![]()
![]()
|
|
|
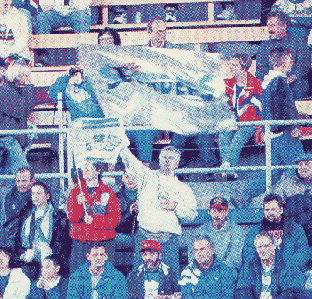
Unfortunately, the Sounders do not currently sell flags. However, making a flag is not an impossible task. In fact, the author made one himself (well, with a little help from his fiance <g>). But even if you don't have a woman's help, it's not a big deal. Really. And if you're REALLY ambitious, a "big ass" flag will win you big points with your fellow supporters (see here for a sample we're having done for this season!!) There's a good "how-to" on the Sam's Army site that details how you can make your own flag. I chose a little easier path which I detail here. Feel free to choose your own method, whatever floats the ol' boat. The instructions here are for a simple tri-color flag, without a logo or lettering. This can be easily adapted if you want two colors (such as a two-triangle bi-color, or two horizontal stripes). The example below ran about $25-$30 in materials. 1) Figure out how big you want your flag. For my example, I made one approximately 6 feet wide by 4 feet in height. Big enough to make a statement :) 2) Go to a fabric supply store and get some rip-stop nylon. This stuff is heavy duty, yet light enough to easily wave. I recommend Seattle Fabrics for you locals, on 87th & Aurora in North Seattle. They have a large range of colors (most importantly for us Sounder supporters, they have the team colors of aqua, purple, and white). Other stores such as Jo-Ann Fabrics or Pacific Fabrics also carry ripstop nylon, but you may not find a wide range of colors. Rip stop nylon should run about $6.75 a square yard. The material generally comes in 60" (5 feet) rolls, so if you want to make a 3' x 5' single color flag, you're already halfway home. The stores should also carry thread of the same color as your nylon, make sure you get this while you're there. 3) Once you have enough material, cut it to size. If you beg nicely enough, the fabric store may cut it to size for you. If not, or if you're in a hurry, just make sure you get your edges straight and cut the pieces of each color into equal swaths. 4) If you absolutely can't see yourself sewing anything, or don't have a woman who's crafty or who can show you what to do, then stop here and take your materials into an alteration place. They should be able to sew it up for you fairly inexpensively. Count on around $20/hr for these services, give or take. Try to avoid the times before prom and homecoming if you need quick turnaround. 5) If on the other hand, you've got sewing skills or have conned someone (your wife or girlfriend) into helping you, take a break, have a brewskie or take your helper out to eat. Doesn't hurt to suck up a bit here, especially for those last minute features like lettering you might try and sneak in at the last minute ;-) 6) Make sure you've gotten your edges cut straight and into the proper dimensions. Then, fold about a 1/4" - 1/3" of fabric on the sides that will form the top and bottom edges of the flag (for horizontal tri-colors, if you're doing a vertical tri-color a la the French flag then your edges will the left and right sides of the flag instead), and use an iron to create a seam line (this helps create a straight seam). You want this so the edges of the flag won't fray. You may find using pins to hold the line in place to be helpful. Sew the hems in with the correct color thread. You should now have three pieces or stripes -- two stripes will have hem lines for the top and bottom. 7) Now sew the three stripes together. This is easier if you're not picky about the color of the thread showing up on a different color stripe, or the back side of the flag having a bit of extra material sticking out... it's really NOT that visible... Just use the color thread that blends in the best with the two colors you're stitching together. 8) Now that the pieces are attached, do another hem line on the remaining two rough edges (the left and right side for a horizontal tri-color). 8) OK, now you've got a banner with hems... what to do about attaching it to a pole? If your home stadium doesn't allow flag poles, period, you can call it done, or... do what I did and allow your flag to slip on and off a pole so it can be easily used in either situation. For a cheap flag pole, go to Home Depot or some other large hardware store and get a wood closet dowel (say, 1/2" to 3/4" in diameter, depending on how big your flag is). You can have these cut to exact heights at the store, so if you have a 4 foot height flag, maybe 5 1/2 to 6 foot will work for the pole length. 9) Once you've got the pole home, wrap the flag (at the side you want to attach to the pole, careful here) around the pole once. Mark the line on the fabric, and then loop the fabric from the edge to the interior where the line is and double stitch/hem with the sewing machine. You should now be able to (snugly) fit your flag onto the pole and have it stay put while being waved. If you go to a stadium that doesn't allow flag poles, simply pull the flag off the pole. It can be put back on just as easily. 10) Voila!! Optionally, if you want your club's name or logo on the flag, you can get adhesive cloth from your fabric store and some large stencils from a crafts store, cut out the letters, and then attach them in the middle (or wherever you choose). While not permanent, these should last a while. For better wear, these can be sewn on after attachment. For logos, the process is similar, but you'll be cutting out irregular pieces of cloth rather than doing stencils. See the above Sam's Army link on how to do that.
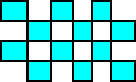
OK, none of that puny-ass stuff for you. You want BIG. You want to make a statement... Well, it's going to cost a bit more... Our 10' x 15' checkerboard cost about $75 in material, and about $75-$85 in labor to assemble. This is something you likely should leave to professionals to sew for you. This example assumes a 10' x 15' two color alternating checkerboard design, and is an adaptation of a flag that Kansas City Wizards supporters made last year. If yours is sized differently, use those rusty arithmetic skills and adjust proportionally. 1) Buy two sheets of rip-stop nylon about 16-17 feet long (the roll should already be 5 feet in height), one in each color you want in the flag. It's a good idea to get an extra foot or two to give a margin for error, and because you're going to lose an inch or two for hemming the individual squares. The idea here is to have 4 horizontal rows and 6 vertical columns of alternating colored squares, where each square is 2 1/2 feet by 2 1/2 feet (approximately). 2) Do a little comparison shopping to see what rates are for custom sewing/tailoring. You'll probably pay around $20 or so per hour, this type of flag generally will take about 4 hours for the seamstress to cut & assemble. 3) Once you've settled on a vendor, draw a diagram of what you want (start with the two rectangles representing the sheets in step 1, show individual alternating colored squares 2 1/2' x 2 1/2' which will illustrate to the seamstress how to assemble these into individual rows, then show the finished product at the bottom). Diagrams usually are clearer than trying to explain this to people who are not footy supporters :) 4) You will want to make sure that the squares have strong stitching between them to avoid having to constantly repair rips. The individual rows should be serged together rather than simply sewn. Make sure your vendor has a serger on hand for this job. 5) If you have lettering or logos, you can also have the vendor sew these on as they go, or use the adhesive cloth as in the above example to do it yourself after the fact. |